Published Book on Amazon
| All of IOT Starting with the Latest Raspberry Pi from Beginner to Advanced – Volume 1 | |
| All of IOT Starting with the Latest Raspberry Pi from Beginner to Advanced – Volume 2 |
출판된 한글판 도서
| 최신 라즈베리파이(Raspberry Pi)로 시작하는 사물인터넷(IOT)의 모든 것 – 초보에서 고급까지 (상) | |
| 최신 라즈베리파이(Raspberry Pi)로 시작하는 사물인터넷(IOT)의 모든 것 – 초보에서 고급까지 (하) |
Original Book Contents
18.3.2 Desktop GUI connection Using VNC Program
VNC (Virtual Network Connection) is a connection method that connects to a remote computer from my local computer and provides the ability to control the computer at will as if it were my own computer.
VNC program consists of a VNC server and a VNC client, each of which interacts with each other remotely.
There are a number of these VNC programs, and <TightVNC> and <RealVNC> are popular well known program.
In Raspberry Pi system, <TightVNC program is included as a basic supporting program and can be used normally after the installation process. Of course, you can also install and use other VNC programs if you want. On a computer that wishes to connect to the Raspberry Pi system, a suitable VNC client program compatible with the Raspberry Pi system's VNC server can be used. <TightVNC> server and <RealVNC> client are compatible with each other.
Here, we will install and use <TightVNC> program as server and client. To download the program, please refer to the homepage below:
■ http://www.tightvnc.com/download.php
18.3.2.1 Installing <TightVNC> Server
We will install the <TightVNC> server program as shown below. When you execute the command, the program installation starts and the following message is displayed.
| pi@raspberrypi ~ $ sudo apt-get install tightvncserver |
|
~ Skip ~ Skip ~ Skip
|
After the VNC server is installed, you need to create a session to use for VNC connection. We create a session by running the "tightvncserver" command or the "vncserver" command as shown below. Here, ":1" means session number, and If you want to add multiple sessions, you need to increase this number to create multiple sessions. Note If you do not specify a session number, the session is created starting with ":1".
If you enter the command to create a session, the setting screen for session is displayed as shown below.
| pi@raspberrypi ~ $ vncserver:1 |
| You will require a password to access your desktops.
Password: Verify: Would you like to enter a view-only password (y/n)? n
New 'X' desktop is raspberrypi:1
Creating default startup script /home/pi/.vnc/xstartup Starting applications specified in /home/pi/.vnc/xstartup Log file is /home/pi/.vnc/raspberrypi:1.log |
When the command is executed, you must first enter the password required to remotely connect to VNC server. Then you are prompted to re-enter the "view only" password, which is optional and not required. If you connect to VNC with "view only" option, you can see the screen, but you can not do anything special.
When you start a new command again, a session with session number automatically increased by one is created. If you create a new session like this, you will not be prompted for a password and will use the previously specified password.
| pi@raspberrypi ~ $ tightvncserver |
| New 'X' desktop is raspberrypi:2
Starting applications specified in /home/pi/.vnc/xstartup Log file is /home/pi/.vnc/raspberrypi:2.log |
The <TightVNC> program uses "5900" as the default port, and if you create a new session in this way, a new port number with a session number added is created. In other words, it creates "5901" port if it is session 1 and "5902" port if it is session 2.
18.3.2.2 Automatic Startup of <TightVNC> Server
When the Raspberry Pi system is terminated, the execution of these VNC server programs is stopped, and the next time the system boots again, it is not executed automatically. Therefore, you can not connect to the server from client unless you run the server program every time the system boots. It is inconvenient to manually run the VNC server program every time the system boots, so it will be very convenient to use the way that the server program starts automatically.
To make <TightVNC> server run automatically when booting, you can use the following method:
■ How to use the settings in the /etc/rc.local file
■ How to use a startup script
■ How to set automatic startup based on desktop booting
● How to use the settings in the /etc/rc.local file
This method uses a script file that is executed at system boot time. To use this method, modify the contents of the /etc/rc.local file as follows.
| GNU nano 2.2.6 File: /etc/rc.local |
| #!/bin/sh -e # rc.local # # This script is executed at the end of each multiuser runlevel. # Make sure that the script will "exit 0" on success or any other # value on error. # # In order to enable or disable this script just change the execution # bits. # # By default this script does nothing.
# Print the IP address _IP=$(hostname -I) || true if [ "$_IP" ]; then printf "My IP address is %s\n" "$_IP" fi
vncserver :1 exit 0 |
● How to use start script
This method registers the program in the Schedule Task that is automatically executed by the system and let the program execute automatically every time the system starts.
To do this, you first need to create a startup script for the <TightVNC> server. Use a text editor to modify the contents of the /etc/init.d/tightvnc file as follows:
| GNU nano 2.2.6 File: /etc/init.d/tightvnc |
| ### BEGIN INIT INFO # Provides: tightvnc # Required-Start: $remote_fs $syslog # Required-Stop: $remote_fs $syslog # Default-Start: 2 3 4 5 # Default-Stop: 0 1 6 # Short-Description: Start TightVNC Server at boot time. # Description: Start TightVNC Server at boot time. ### END INIT INFO #! /bin/sh # /etc/init.d/tightvnc
USER=pi HOME=/home/pi Export USER HOME
case "$1" in start) echo "Start TightVNC Server" /usr/bin/vncserver :1 ;; stop) echo "Stop TightVNC Server" /usr/bin/vncserver –kill :1 ;; *) echo "Usage: /etc/init.d/tightvnc start|stop" exit 1 ;; Esac
exit 0 |
Use the "chmod" command to change the state of the generated startup script file into an executable file.
| pi@raspberrypi ~ $ sudo chmod +x /etc/init.d/tightvnc |
You then need to register the script in the system so that the script can run automatically.
| pi@raspberrypi ~ $ sudo update-rc.d tightvnc defaults: |
| update-rc.d: using dependency based boot sequencing |
After doing this, the first time you run <TightVNC> server, you will be prompted to re-enter the VNC password because it will be run as the "root" account, not the "pi" account that first set up VNC server when the script is run.
● How to set automatic startup based on desktop booting
This method can be used when the Raspberry Pi system is set to automatically login to the Desktop GUI window when booting. With this method, <TightVNC> server will run automatically when the system log into the window.
To do this, first create an "autostart" directory in the "/home/pi/.config" directory.
| pi@raspberrypi ~ $ mkdir ./.config/autostart |
Create a file called "tightvnc.desktop" in the directory "/home/pi/.config/autostart" and enter the followings:
| [Desktop Entry] Type=Application Name=TightVNC Exec=vncserver :1 StartupNotify=false |
18.3.2.3 Connecting Using VNC client
This section describes how to connect to the Raspberry Pi system installed with <TightVNC> server using VNC Client on MS Windows or Apple Mac.
● Installing VNC client program
To access Raspberry Pi system using VNC, you need to install VNC client program. General VNC client program is provided in a form that can be formally installed on an MS Windows or an Apple Mac, so that it can be installed through a normal installation process.
● Connecting VNC server
If you install and run <TightVNC> client program on a specific computer, the following screen will appear. Enter IP address or host name of the Raspberry Pi system you want to connect to, and then specify ": session number" as shown on the screen. At the same time, preset data can be entered and used for various desired items. Enter the necessary data and press the [connect] button. Then you will see the screen to enter the password as shown below. The password you enter here is not the account password of a specific user, but the password you specified when you created the session in the VNC server configuration. Even Though you have multiple sessions, you can use a common password.
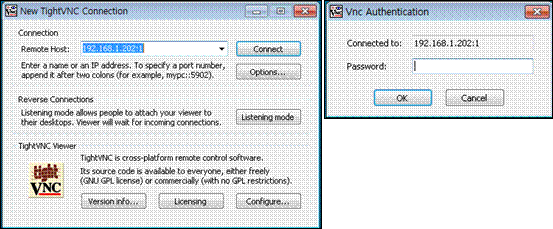
Figure 18‑3 Desktop GUI connection client setup using <TightVNC> program
If you enter the password and click [OK] button, you can access Raspberry Pi's Desktop window screen as follows. When connecting to Raspberry Pi system, logon with "pi" user account.
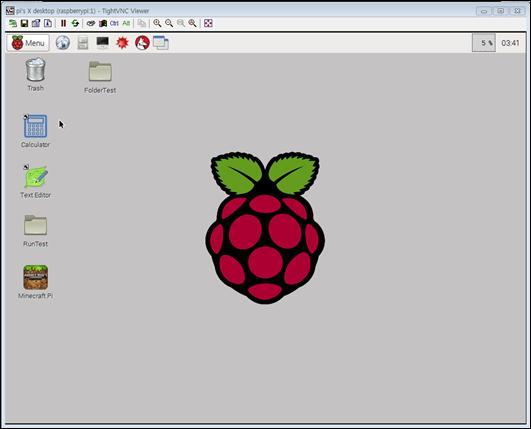
Figure 18‑4 Desktop GUI connection using <TightVNC> program