Published Book on Amazon
| All of IOT Starting with the Latest Raspberry Pi from Beginner to Advanced – Volume 1 | |
| All of IOT Starting with the Latest Raspberry Pi from Beginner to Advanced – Volume 2 |
출판된 한글판 도서
| 최신 라즈베리파이(Raspberry Pi)로 시작하는 사물인터넷(IOT)의 모든 것 – 초보에서 고급까지 (상) | |
| 최신 라즈베리파이(Raspberry Pi)로 시작하는 사물인터넷(IOT)의 모든 것 – 초보에서 고급까지 (하) |
Original Book Contents
23.4.5 Explaining How to Write Program Using Example
Here, we will explain the usage briefly with examples.
23.4.5.1 Moving [Cat] Sprite
The first time Scratch starts, there will be a "cat" in empty Stage. The "cat" is one of Sprites available in Scratch, [Cat] Sprite.
To move the [Cat] Sprite, do the following works:
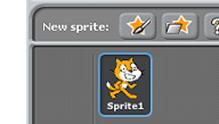
■ In Sprite Area, click [Cat] Sprite.
■ Select [Control] palette in Blocks Palette Area. You will see several Blocks below.
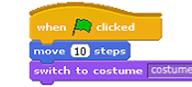
■ Drag [When green flag clicked] Block among several Blocks and place it in Script Area in the center of the screen. This Block is a type of trigger Block that allows a system to start an action. It is used to instruct a system to start action when pressing [green flag] button at the top right of the screen.
■ Select [Motion] palette in Blocks Palette Area. You will see many Blocks below.
■ Add a green [Move 10 steps] Block among many Blocks to the Script Area, and associate it with the [When green flag clicked] Block. The number "10" specified in this Block indicates how much it will move once it is moved. If you specify this number as (-), it will move in the opposite direction.
■ If you press [green flag] button at the top right of the screen, you can now see the [Cat] move. When this button is pressed, program operation is started by the [When green flag clicked] Block above.
■ Below is the shape after creating work is completed.
|
|

23.4.5.2 Changing the Appearance of [Cat] Sprite
The appearance of a Sprite in Scratch is called Costume. All Sprites can wear different Costume. To change Costume of a Sprite, do the works as follows:
■ In the Sprite Area, click and select the Sprite you want to work with. Click [Costumes] tab in Script Area at the center of the screen.
■ You can see that [Cat] Sprite has two Costumes. If you click [Copy] to create a third Costume, a new [Cat] Costume will appear.
■ Then, select <costume3> and click [Edit]. [Paint Editor] screen will open. Try all the buttons and tools here and experiment with what happens.
■ Next, put some clothing on the Costume and press [OK] button.
■ If you want to change a costume in execution process, click [Scripts] tab, click the purple [Looks] Palette in the Block Palette Area, and then add [Switch to Costume] block to the Script Area and connect to the other Block.
■ Select [costume3] from the drop-down menu in the purple [Switch to Costume] Block.
■ Now you can see that the Costume changes when you run the program.
■ Below is the shape after creating work is completed.
23.4.5.3 Adding Sprite
If you do not like [Cat] Sprite, you can add another Sprite or create your own Sprite. Above Sprite Area, there are three buttons used to create a new Sprite.
■ The first button is [Paint new sprite]. Clicking this opens [Paint Editor] window, where you can use various shapes, lines, or hand drawn pictures to create interesting characters.
■ The second button is [Choose new sprite from file]. If you use this button, you can select and use something that has already been created in Scratch or that is stored in a file of Raspberry Pi. By clicking on it, you can search through the various folders that contain Sprite and choose what you want.
■ The third button is [Get surprise sprite]. Please press it to see what is happening.