Published Book on Amazon
| All of IOT Starting with the Latest Raspberry Pi from Beginner to Advanced – Volume 1 | |
| All of IOT Starting with the Latest Raspberry Pi from Beginner to Advanced – Volume 2 |
출판된 한글판 도서
| 최신 라즈베리파이(Raspberry Pi)로 시작하는 사물인터넷(IOT)의 모든 것 – 초보에서 고급까지 (상) | |
| 최신 라즈베리파이(Raspberry Pi)로 시작하는 사물인터넷(IOT)의 모든 것 – 초보에서 고급까지 (하) |
Original Book Contents
25.5 Preparations and Usages for Interface
25.5.1 GPIO Extension Board
Raspberry Pi's GPIO pin is attached to the body of the system board, so it is difficult to connect to the external circuit when you put the board itself in the protective box. Also, as the name of each pin is not marked, you have to check each pin one by one when you are work with it. Also, it is very inconvenient to connect electronic parts or circuits directly to the GPIO pins due to the shape of individual pin or the space constraint between the pins.
Therefore, tools that allow to work freely in the external device by extending the GPIO device of Raspberry Pi main body to the outside, connecting it to the external device so that each pin of GPIO can correspond to each pin of the external device are provided. These components are called GPIO extension board or Cobbler.
With this tool, as you can easily configure the circuit in a large space and all pin names are written on the board surface so that you can easily find the location of the necessary pin when you are working with it, it is easy to make a prototype by constructing and testing a circuit experimentally.
Various types of extension boards have been developed and sold in the market. Below is an example of a typical T-shaped GPIO externsion board used by many people.
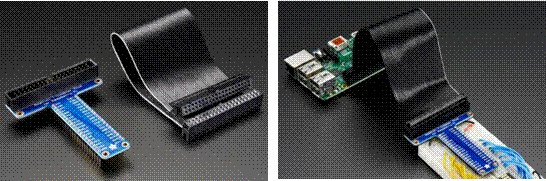
Figure 25‑10 GPIO externsion board
The above left shows that Raspberry Pi 2, B+ T-shaped GPIO externsion board Cobbler and GPIO 40 pin cable. The above right shows that T-shaped GPIO extension board is inserted on the breadboard and GPIO on the Raspberry Pi main body and cable are connected with each other. In this state, you can connect the various circuits and components on the breadboard and make the prototypes by performing the necessary circuit work.