Published Book on Amazon
| All of IOT Starting with the Latest Raspberry Pi from Beginner to Advanced – Volume 1 | |
| All of IOT Starting with the Latest Raspberry Pi from Beginner to Advanced – Volume 2 |
출판된 한글판 도서
| 최신 라즈베리파이(Raspberry Pi)로 시작하는 사물인터넷(IOT)의 모든 것 – 초보에서 고급까지 (상) | |
| 최신 라즈베리파이(Raspberry Pi)로 시작하는 사물인터넷(IOT)의 모든 것 – 초보에서 고급까지 (하) |
Original Book Contents
25.7.2 Digital Input – Button Input
Here we will show an example of connecting a button to Raspberry Pi, reading the pin's input signal, and processing it to see if the button is pressed.
25.7.2.1 Input Method of <RPi.GPIO> library
There are falling method and interrupt method to process input using <RPi.GPIO> library. The following describes each of them.
● Input of falling method
Falling method means continuously checking the state of the pin, so as to check whether the state of the pin has been changed, it reads the input value of the pin continuously and compares it with the previous state and confirms change.
Write a program in the following way.
| ~ Skip
while True: if GPIO.input(11) == False: # action code to be done time.sleep(0.1)
~ Skip |
In the above, it continuously receive input from the pin with "input( )" function and judge whether the value is changed by itself . It is planned that the necessary work is processed when the value is changed.
This method does not handle anything while checking whether the state has changed. If the button is pressed very quickly, the change state may end before the input value is read.
● Input of interrupt method
Interrupt method, on the other hand, refers to a method in which when a certain event occurs or a pin status is changed, the program automatically detects the change and generates an interrupt to notify that the change has been made, and processes a predetermined task to be performed when the interrupt occurs.
In this method, works to be executed when the input voltage of a certain pin is changed from "HIGH" to "LOW" or from "LOW" to "HIGH" is registered in advance, and the job is automatically executed when the status is changed.
Write the program in the following way.
| ~ Skip
def callback_routine(channel) : # action code to be done
GPIO.add_event_detect(11, GPIO.FALLING, callback=callback_routine)
while True: time.sleep(1)
~ Skip |
In the above, it first define "callback_routine( )" function to define the operation to be executed when an interrupt occurs.
Next, "GPIO.FALLING" is specified as a condition that interrupt should be generated for a specific pin by using "add_event_detect( )" function, and "callback_routine" is specified as an operation to be performed when an interrupt occurs. If you register such an event like this, the specified task will be processed immediately when the event occurs.
The options that can be used in the condition of interrupt occurrence are as follows.
■ GPIO.FALLING -- Interrupt call when pin voltage changes from "HIGH" to "LOW"
■ GPIO.RISING -- Interrupt call when pin voltage changes from "LOW" to "HIGH".
On the other hand, an event handler program that manages all the events occurring in the system is executed in a separate thread. If an event is registered with "add_event_detect( )" function, the event is registered in the event handler. The event handler continuously checks whether an event has actually occurred for the registered event. If an event occurs, the event handler notifies the registered program of the event and performs the designated operation.
25.7.2.2 Push Button Connection and Circuit Description
Here, we will make an example of connecting a push button to Raspberry Pi, and displaying the message that the button is pressed on the screen when the button is pressed.
First, connect Raspberry Pi to the push button as shown in the following circuit diagram. First, place push button on the breadboard with the same line in a row across the left IC and right IC. Connect one wire of the button to pin 6 (GND) and the other wire to pin 11.
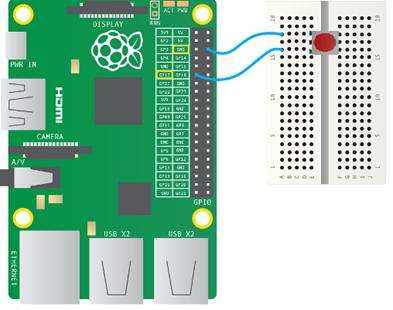
Figure 25‑19 Connection of push button and circuit
In this case, when letting the current to flow through the circuit, we will not use the official power supplied from pin 1 of Raspberry Pi, but use the output from pin 11 connected to the circuit will be used as power.
There are two ways to get the power out of the pin. One is to output "HIGH" to the corresponding pin in the program, and the other is to use the pull-up resistor of the corresponding pin.
Our goal here is not to output to the pin but to process the input signal from the pin, so we will use the method of making the output using the pull-up resistor of the pin. When the pull-up resistor is set on the pin, the basic voltage of the pin when the button is not pressed is "HIGH". When the button is pressed, the current flows and is connected to pin 6 (GND), so that the voltage applied to pin 11 is released and becomes "LOW" state.
One thing to remember here is that each pin of GPIO has a pull-up resistor and a pull-down resistor, which you can use selectively.
The meanings of resistors are as follows.
■ When using a pull-up resistor, it applies a voltage to the pin to make it "HIGH" state.
■ When using a pull-down resistor, it lets the pin to be "Low" state of low voltage.
25.7.2.3 Processing Button Input with Falling Method
Here, we use the falling method to process a push button input. To do this, we continually read the input of the pin to see if the state has changed, and if it is confirmed that the button has been pressed, it will process the specified action.
We use Python 3 as program development language and use <RPi.GPIO> library for GPIO processing. Start Python 3 IDLE, write the following Python program, and save it in "button_falling.py" file.
| import RPi.GPIO as GPIO import time
GPIO.setmode( GPIO.BOARD) GPIO.setup(11, GPIO.IN, pull_up_down=GPIO.PUD_UP)
request_count = int(raw_input("Enter Button Press Count ->")) button_count = 0
while True : button_input = GPIO.input(11)
if button_input == False : button_count = button_count + 1 print("Button Pressed ->%d" %(button_count ) ) time.sleep(1)
if button_count >= request_count : break
GPIO.cleanup() print ("Button Press Ended") |
Here is a look at the contents of the above program.
■ This imports "RPi.GPIO" to use <RPi.GPIO> library function in the program.
■ This imports "time" to handle time related processing in the program.
■ This sets the pin numbering system to BOARD system with "setmode( )" function.
■ This sets pin 11 as input with "setup( )" function, and activates the pull_up resistor for that pin with parameter "pull_up_down=GPIO.PUD_UP". That is, the basic voltage of the pin is set to "HIGH" state.
■ This takes a maximum number of times button is pressed with "raw_input( )" function.
■ This reads the incoming value from the button with "input( )" function. The input value "True" means button is not pressed. The input value "False" means button is pressed.
■ When a button is pressed, a message is displayed on the screen. If the number of times the button is pressed is greater than the number of times previously entered, the button input process should be stopped.
■ When all processing is complete, this initializes the GPIO to its initial state with "cleanup( )" function.
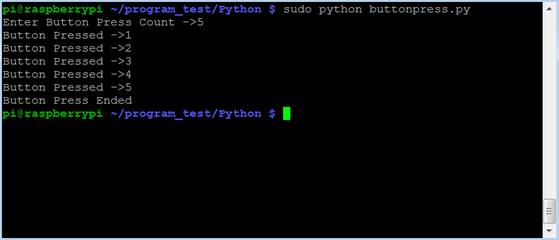
Execute the following program with "sudo" command on Terminal screen. You will then enter the maximum number of times you want to press the button, and then the message will be displayed on the screen each time you press the button.
| sudo python button_falling.py |
25.7.2.4 Processing Button Input with Interrupt Method
Here we use the interrupt method to process the push button input. To do this, we will use a function that automatically detects whether the input state of the pin has changed or not, and will process the specified operation if it is confirmed that the button has been pressed.
We use Python 3 for program development language and use <RPi.GPIO> library for GPIO processing. Start Python 3 IDLE, write the following Python program and save it in "button_event.py" file.
| import RPi.GPIO as GPIO import time
GPIO.setmode( GPIO.BOARD) GPIO.setup(11, GPIO.IN, pull_up_down=GPIO.PUD_UP)
request_count = int(raw_input("Enter Button Press Count ->")) button_count = 0
def button_press_rtn(channel) : button_count = button_count + 1 print("Button Pressed ->%d" %(button_count ) ) time.sleep(1)
GPIO.add_event_detect(11, GPIO.FALLING, callback=button_press_rtn)
while True : time.sleep(1) if button_count >= request_count : break
GPIO.cleanup() print ("Button Press Ended") |
Here is a look at the contents of the above program.
■ This imports "RPi.GPIO" to use <RPi.GPIO> library function in the program.
■ This imports "time" to handle time related processing in the program.
■ This sets the pin numbering system to BOARD system with "setmode( )" function.
■ This sets pin 11 as input with "setup( )" function, and activate the pull_up resistor for that pin with "pull_up_down=GPIO.PUD_UP" parameter. That is, the basic voltage of the pin is set to "HIGH" state.
■ This takes a maximum number of times button is pressed with "raw_input( )" function.
■ This specified the operation to be performed when button is pressed by defining "button_press_rtn" function.
■ This specifies the condition under which an interrupt occurs and the actions to be taken when an interrupt occurs with "add_event_detect( )" function. Since "GPIO.FALLING" is specified here, an interrupt will occur when the pin voltage changes from "HIGH" to "LOW".
■ When the button is pressed, "button_press_rtn" function is executed to display a message on the screen.
■ This wait continuously until the program is terminated with "while" statement. If the number of times the button is pressed is greater than the number of times previously entered, the program stops waiting.
■ When all processing is complete, this initializes the GPIO to its initial state with "cleanup( )" function.
Execute the following program with "sudo" command on Terminal screen. You will then enter the maximum number of times you want to press the button, and then the message will be displayed on the screen each time you press the button.
| sudo python button_event.py |